Export Notion Database to Google Sheets: 3 Methods Compared (2026)
Exporting Notion to Google Sheets in short: You have two routes. For a one-time copy, export the Notion database as a CSV (three dots, Export, Markdown and CSV) and import it into Google Sheets. For data that stays current, use a real-time sync add-on like Sync2Sheets, which keeps both updated automatically.
Notion databases are great at storing and organizing pages. They're less great when you want to run pivot tables, build charts, or push the data through a spreadsheet formula. That's when exporting to Google Sheets becomes the obvious move.
Two methods exist: a manual CSV export (free, slow, one-shot) and real-time sync tools (automatic, kept current, and modern ones are 2-way). This guide walks through both, then gets into where each one makes sense. For the real-time method, Sync2Sheets keeps your Notion database and Google Sheet in sync in real time, in both directions. For a head-to-head of the five main sync tools, see our comparison of Sync2Sheets, Dokin, Whalesync, Coefficient, and Zapier.
Why export in the first place
Three reasons people end up here:
1. Backup
Notion can lose data. It shouldn't, but accidents happen. A synced Google Sheet is a second copy, in a different format, owned by a different vendor.
2. Analysis
Pivot tables, 450+ formulas, charts, Apps Script. Anything data-heavy is faster in Sheets than in Notion.
3. Sharing with non-Notion users
Sheets can be shared with anyone with an email. Notion requires the other person to have or create a Notion account. For client reports, stakeholder dashboards, and cross-team access, Sheets wins.
1. Manual Method: Exporting Notion Databases to CSV

The most basic way to get your Notion databases into Sheets is by exporting your Notion data to a CSV file and then importing the CSV into Sheets. Here's how the process works:
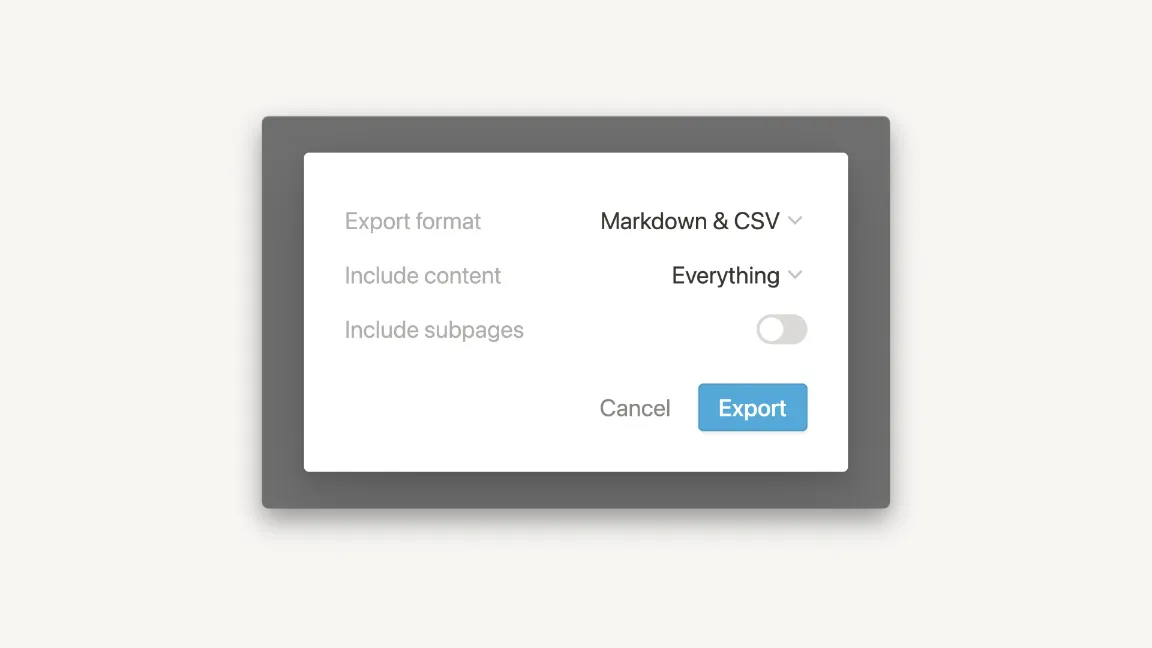
Exporting from Notion
- Open the Notion database you want to export.
- Click on the three dots icon in the upper-right corner of the screen.
- From the dropdown menu, select "Export."
- Choose "Markdown & CSV" as your file format.
- Download your CSV file.
Now, you have a CSV file that contains all the data from your Notion database.
Importing into Google Sheets
To import the CSV into Google Sheets, follow these steps:
- Open Google Sheets.
- Click on "File," then select "Import."
- Choose "Upload" and locate your downloaded CSV file.
- Select "Replace spreadsheet" and finally click on "Import data."
While this process may seem straightforward, it's not automatic. You'll need to perform these steps each time you want to update your data in Google Sheets from Notion, which can be time-consuming and prone to errors, especially if you're dealing with large databases.
The real problem: the CSV is a snapshot. The moment you finish downloading it, your Notion database has probably moved on. Anyone using the Sheet will be looking at stale data within minutes.
2. Automated method: Sync2Sheets
Sync2Sheets is a Google Workspace add-on that syncs your Notion database with a Google Sheet in real time, in both directions. It runs on Notion's official webhooks and Google Drive events (not polling), preserves every property type including rollups and relations, and lets you pick the sync direction for every column.
What you get on top of a CSV export:
- No manual refresh. Every Notion edit propagates within seconds. Every Sheets edit propagates back within seconds.
- Property types stay intact. Colored selects, date ranges, rollups, relations between linked databases with links to the connected pages, rich text. All of it.
- Per-column direction picker. Each column can be Notion to Sheets, Sheets to Notion (great for
=GOOGLEFINANCEor=IMPORTXML), or Both ways. Read-only types like formulas and rollups stay one-way automatically.
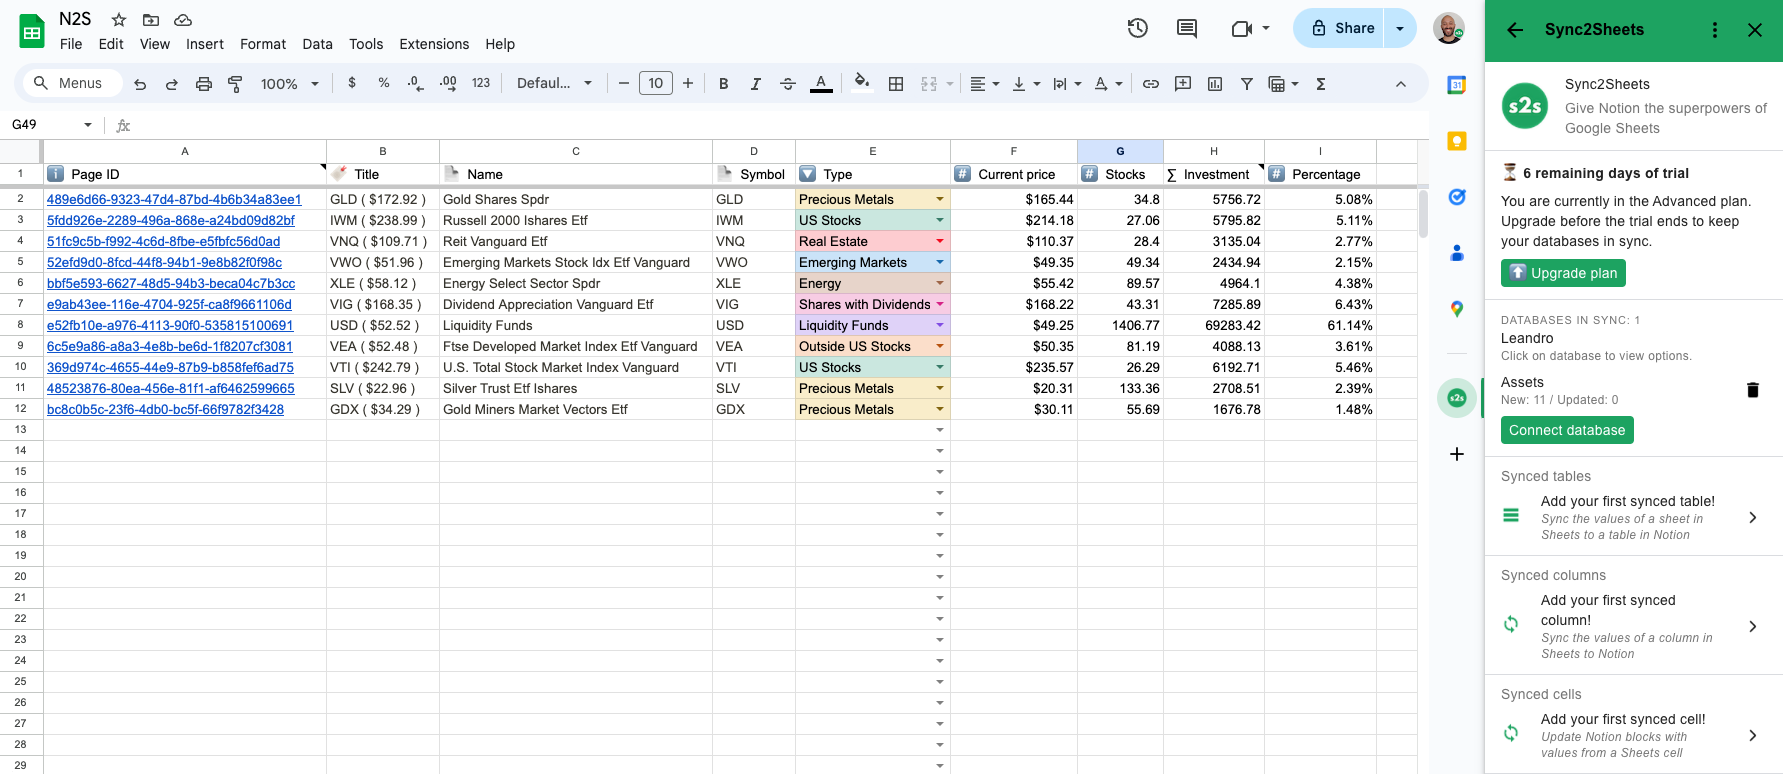
Setting Up Sync2Sheets for Notion Database Syncing
Follow these steps to sync your Notion databases using Sync2Sheets:
- Find Sync2Sheets from the Google Workspace Marketplace: Search for "Sync2Sheets" within the marketplace or follow this link.
- Install the Add-On: Click on the "Install" button and grant the necessary permissions for Sync2Sheets to access your Google Sheets and Notion accounts.
- Open Google Sheets: Create a new spreadsheet where you wish to sync your Notion data or open an existing one.
- Access Sync2Sheets: From within Google Sheets, click on the "s2s" icon on the right sidebar.
- Connect to Notion: In the Sync2Sheets sidebar, click the "Connect Notion Workspace" button and authorize Sync2Sheets to access your Notion workspace.
- Select Your Database: Once connected, click on "Sync Database" and choose the specific Notion database you want to sync.
- Configure Sync Settings: Tailor the sync settings according to your preferences.
- Start Your First Sync: With everything configured, click on "Start Sync". Your selected Notion database will now begin syncing with Google Sheets.
- Verify Data Integrity: After the initial sync, check your Google Sheet to ensure all data has been transferred accurately and reflects your Notion database's structure.
From that moment on, every change in Notion shows up in Sheets in seconds. You can layer pivots, charts, and formulas on top, and they all stay current.
Want Excel instead of Google Sheets?
The CSV route works the same way: Notion's export produces a .csv file that Excel opens directly. The same caveat applies, it is a snapshot that goes stale the moment someone edits the database in Notion.
If you want an Excel copy that stays fresh without repeating the export, sync the database to Google Sheets first, then download the synced sheet as an Excel file whenever you need one (File, Download, Microsoft Excel). The sheet tracks Notion in real time, so every download is current as of that moment.
Which method should you use?
- Manual CSV export: fine for a one-off, a point-in-time backup, or data you never plan to touch again.
- Sync2Sheets: anytime you're going to work with the data more than once. Dashboards, reports, recurring analysis, team sharing, live pages.
For most people, the second option pays for itself in one afternoon of saved CSV shuffling. Install Sync2Sheets and try it for seven days free. If you're comparing sync tools, the five-tool head-to-head covers Sync2Sheets against Dokin, Whalesync, Coefficient, and Zapier.
Frequently asked questions
How do I export a Notion database to Google Sheets?
You have two options. Export the database from Notion as a CSV (open the database, click the three dots, choose Export, pick Markdown and CSV) then import that file into Google Sheets. Or use a real-time sync add-on like Sync2Sheets to keep both updated automatically without re-exporting.
Can I export a Notion database to Excel?
Yes. Notion exports databases as CSV files, which Excel opens directly. Open your database, click the three dots, choose Export, then select Markdown and CSV. The CSV is a one-time snapshot, so you repeat the export whenever the data changes and you want Excel to reflect it.
How do I sync Notion to Google Sheets in real time?
Use a Google Sheets add-on such as Sync2Sheets. Install it from the Google Workspace Marketplace, connect your Notion workspace, pick a database, and start the sync. Changes in Notion appear in the sheet within seconds, and you can set each column to sync one way or both ways.
Is there a free way to export Notion to Google Sheets?
Yes. The manual CSV export is free. Export your Notion database as CSV, then import it into Google Sheets through File and Import. The tradeoff is that the data is a static snapshot, so it goes stale and you must repeat the steps each time you want fresh numbers in the sheet.
Why does my exported Notion data go out of date in Google Sheets?
A CSV export is a snapshot taken at one moment. Once you download it, any later edits in Notion are not reflected, so the sheet drifts out of date within minutes. A real-time sync tool avoids this by pushing every Notion change to the sheet continuously.
Does Sync2Sheets keep Notion rollups and relations when exporting?
Yes. Sync2Sheets preserves property types including rollups, relations with links to the connected pages, colored selects, date ranges, and rich text. Read-only types like formulas and rollups stay one-way automatically, while you choose the direction for other columns: Notion to Sheets, Sheets to Notion, or both ways.
Sync Notion to Google Sheets in real time
Use Sheets formulas in Notion, build dashboards, back up your databases, and compare tools. Free 7-day trial.